

Your website is the hub for your clients’ business interactions; tracking those transactions is imperative for understanding what works and what doesn’t.
Ninja Forms is a plug-in frequently lauded on WordPress sites for its easy-to-use platform, but like any form plug-in, it’s difficult to notify Google Analytics when a client completes a form through Google Tag Manager. When using Ninja Forms and Google Analytics 4 (GA4), we need to track when the forms are submitted and not just when the buttons are pressed.
This step-by-step guide will help you set up your Google Tag Manager to fire tags only when your forms have been submitted, and even better, you can set up separate tags for each form.
Step 1: Create a Tag to Listen for a Form Submission Event
Now this will require a bit of code, but I have that here for you.
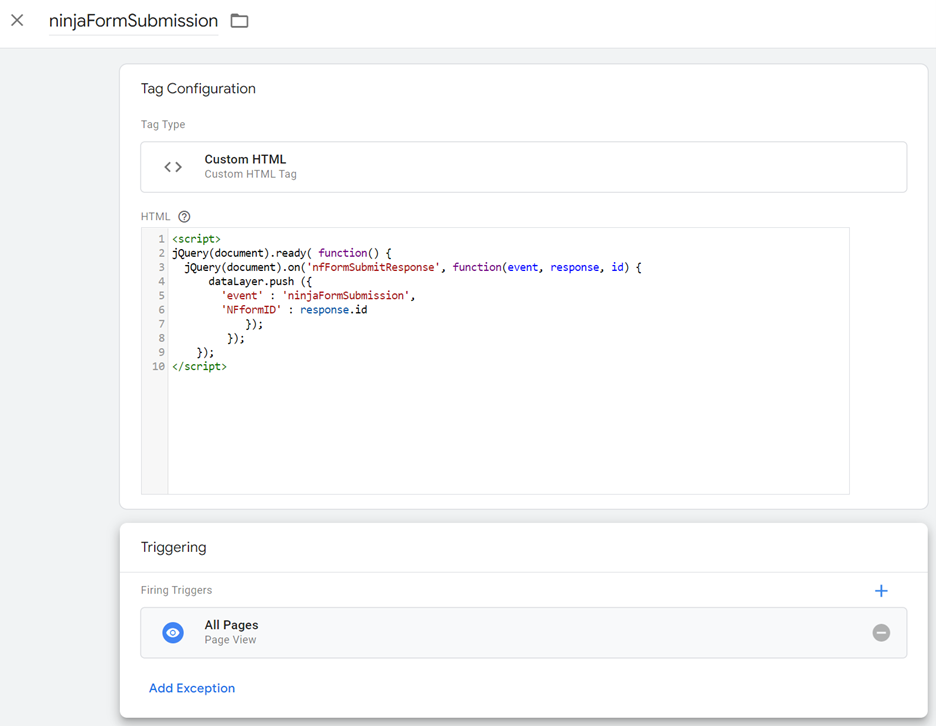
- Start a new tag in the tag manager by going to Tags > New > Tags Configuration > Custom HTML.
- Copy/Paste this script into the tag.
<script>
jQuery(document).ready( function() {
jQuery(document).on('nfFormSubmitResponse', function(event, response, id) {
dataLayer.push ({
'event' : 'ninjaFormSubmission',
'NFformID' : response.id
});
});
});
</script>- Next you need to go to Triggering and have the tag fire on All Pages so that it can listen for a ninja form no matter where the user is on the site.
- Last, you’ll need to name the tag something that you are going to use later. So here I’ve named mine: ninjaFormSubmission
It should look like this when you’re done:
Step 2: Create data layer variable for the Form ID
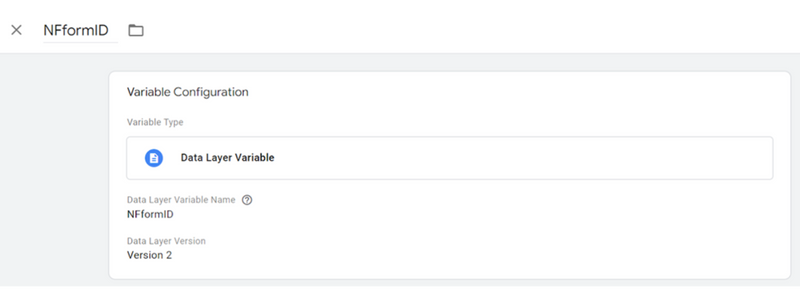
Because we need to differentiate between which form is being submitted, we will need to create a variable in Google Tag Manager that will read the the ID from the code we just created.
- Go to Variables > User Defined Variables > New > Variable Configuration > Data Layer Variable and name it NFformID to keep it consistent.
- Leave the version as is and hit Save.
It should look like this when you’re done:
Step 3: Create a Trigger that Fires on the event we created in Step 1
This step will let you create a trigger that fires when someone submits a form, but we are going to add a stipulation so that it only fires on the form you want it to. So each trigger is form specific. IMPORTANT: You will need to repeat this step for each form.
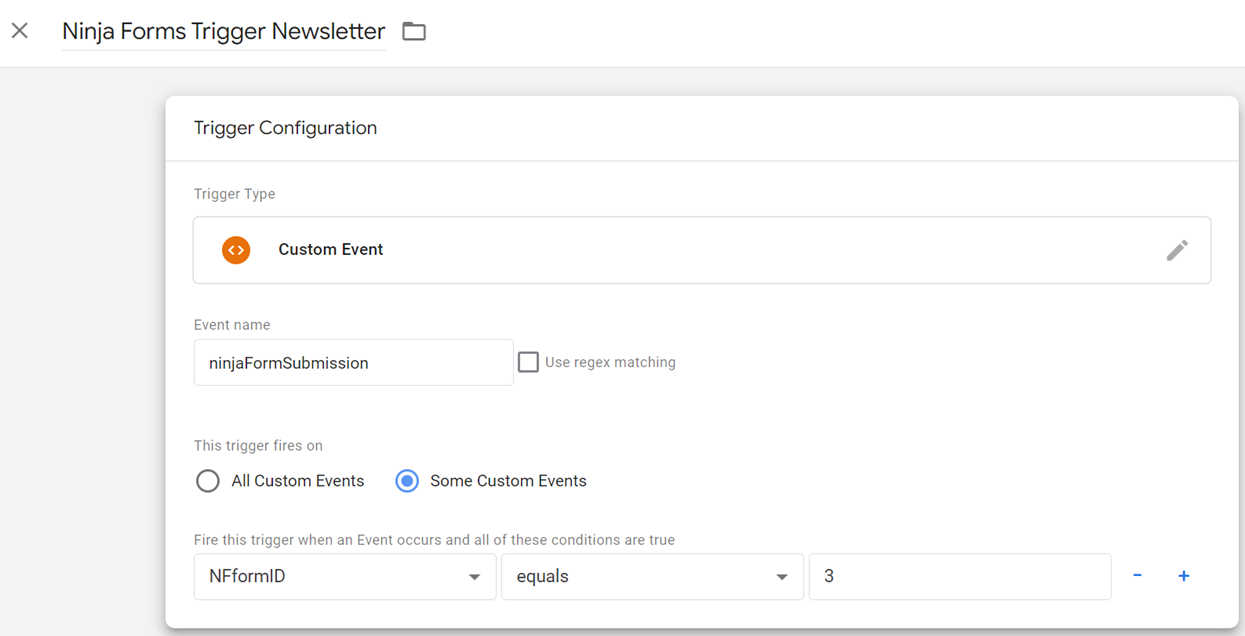
- Go to Triggers > New > Trigger Configuration > Custom Event and we are going to add into the Event Name the name of the event we created in Step 1: ninjaFormSubmission
- Then you are going to select Some Custom Events and we are going to use the name of variable we created in Step 2 from the dropdown: NFformID. Change the middle to “equals” then in the last column you’ll need to enter the number of the id of the form you want to track. This is found in WordPress on your Ninja Forms Plugin Dashboard.
It should look like this when you’re done (with the number being your own corresponding form id):
Step 4: Create a Tag that fires on the trigger we created in Step 3
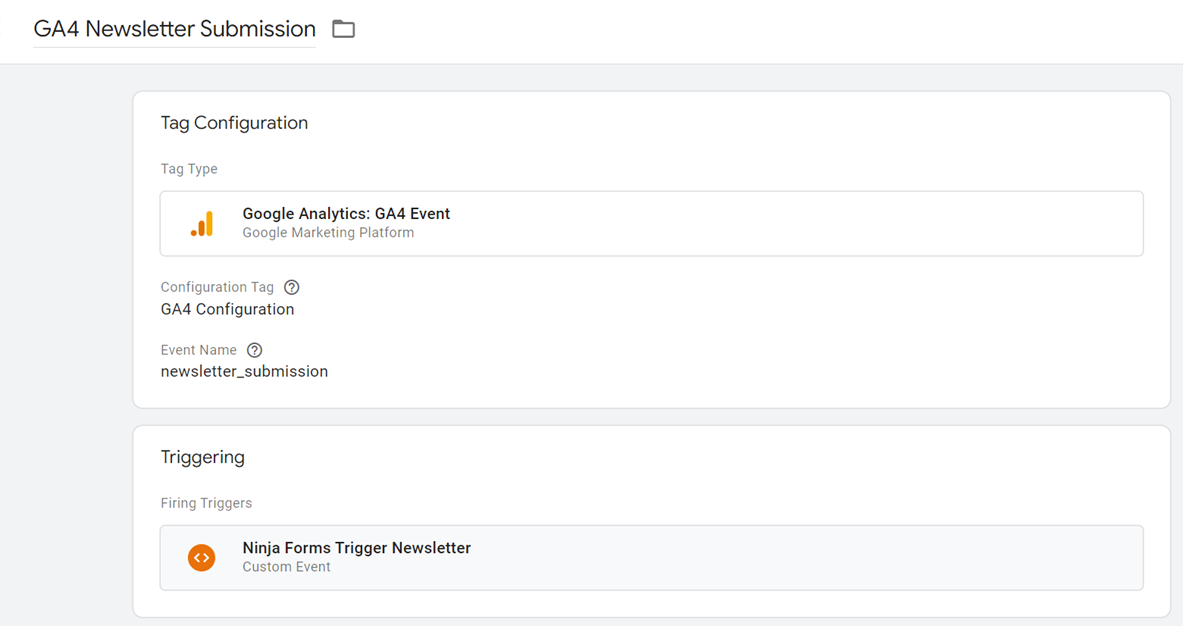
So for every trigger you created, you’ll need to create a tag. This will be how you send GA4 your event data.
- Go to Tags > New > Tags Configuration > Google Analytics: GA4 Event. Use your configuration tag that you have set up for GA4 from the drop down.
- Name your event however you would like it to show up in GA4 for as an event for later. Depending on which form you are creating a tag for, I would name it respectively.
- Next go to Triggering Configuration and add the corresponding trigger for that form that you created in Step 3.
It should look close to this when you’re done:
Step 5: Getting your results out of Google Analytics 4 (GA4)
We’ve set all of the back end up so that now we wait. GA4 is set up so that events don’t appear on your events list until they are triggered. This could be a while depending on how much traffic you get on your site. And even when they are triggered, it takes about 24 hours for them to appear on your list.
- To view your events in GA4, you’ll need to choose Configure from the left navigation menu. These will be all of the events that have been triggered in the time frame at the top.
- Be sure that it has been at least 24 hours since you know that the event has been triggered to go looking for it. You can then mark any of these form submissions as a Conversion if that meets the needs of your business goals.
Tracking all of your business goals on your site can be cumbersome and difficult to manage. GA4 and Google Tag Manager work seamlessly to deliver you events to a place where you can analyze and act on how users are interacting with your site. Having all of that data information assists with measuring your KPIs and getting solid business lead data from your website all in one place.